Most underwater photos and videos you see on Instagram or TikTok have been edited in some way. It does not mean they are fake, but underwater cameras and phones do not always capture the colors exactly the way we see them in real life. Water absorbs light and color very quickly, so straight out of camera underwater photos often look too green or too flat.
In this blog, I will show you exactly how to edit underwater photos on iPhone in less than 5 minutes. This is not a professional desktop editing tutorial, this is my quick phone workflow for making underwater photos look cleaner, more natural, and ready to share on Instagram and TikTok. And honestly, if you are not trying to become a professional underwater photographer, this simple tutorial can already make your underwater photos look 10 times better.
Before we start, you can also watch the full editing tutorial on my YouTube HERE.
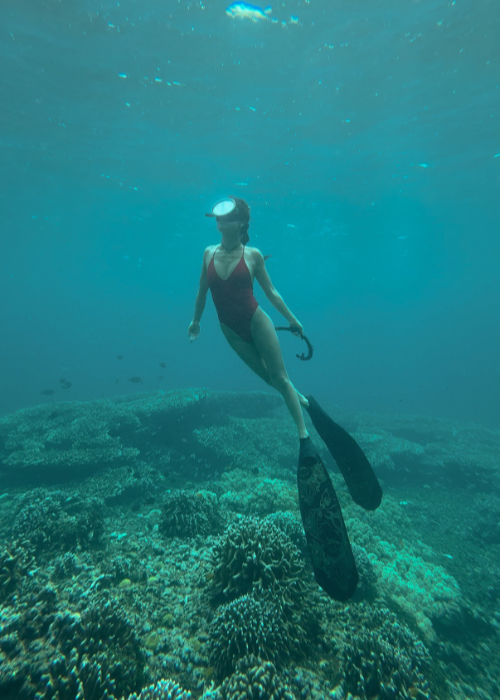
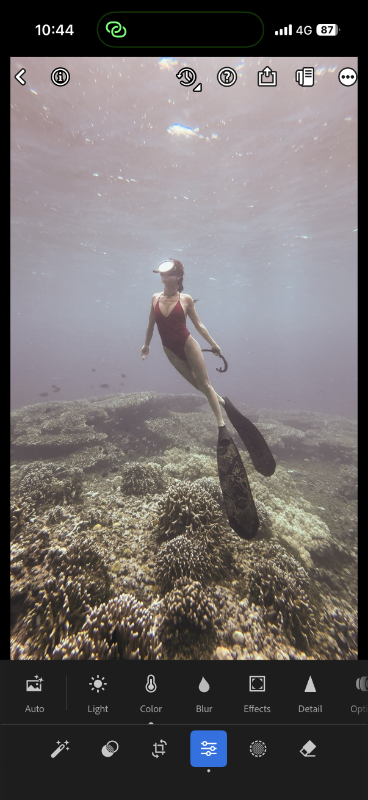
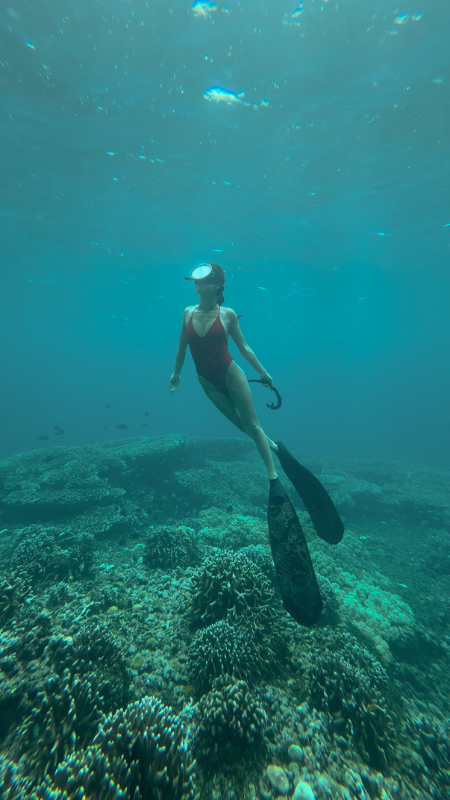
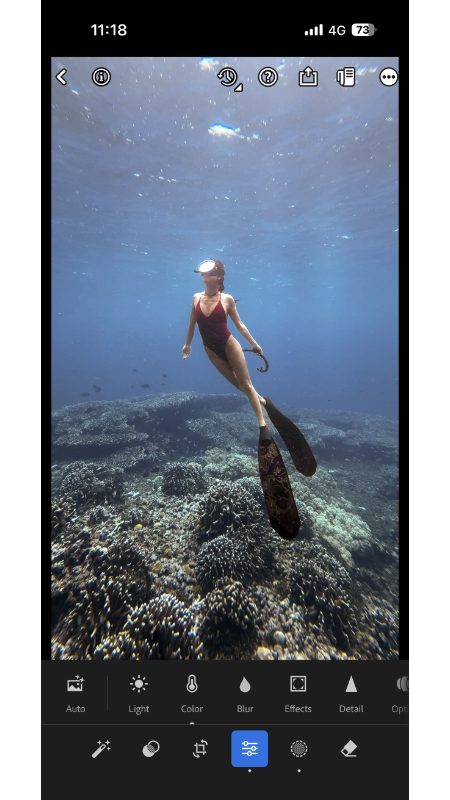
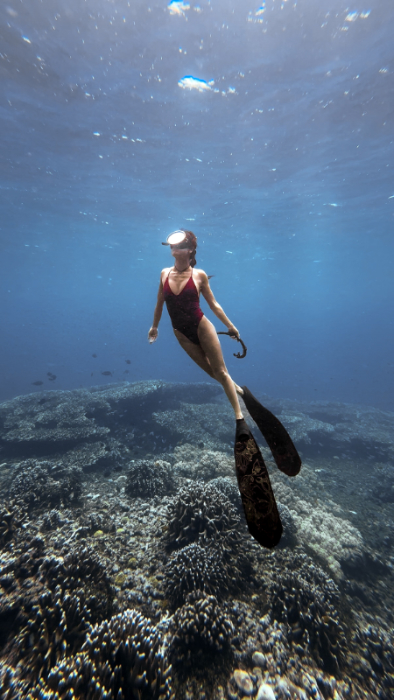
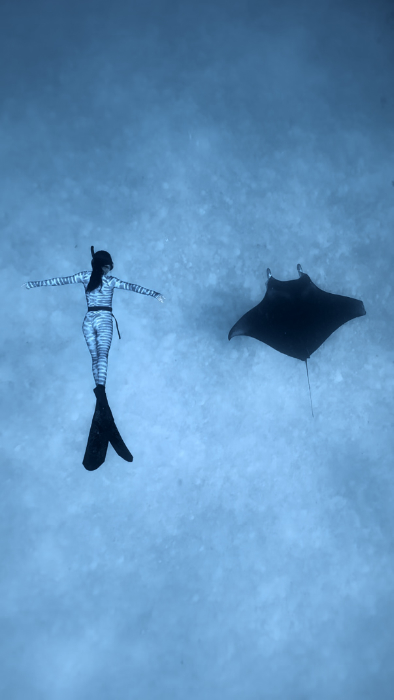
The example photo I am editing here is actually a screenshot from one of my underwater videos shot on an iPhone 16 Pro in Amed, Bali. My boyfriend Adrian filmed this clip for me while we were freediving at around 5 meters depth, and the visibility was not the best that day. I had my iPhone inside a DIVEVOLK SeaTouch 4 Max Plus case, with no red filter, no wide-angle lens, and no extra diving light.
So let me walk you through my editing workflow step by step, including how I adjust the light, color, contrast, and details to bring the underwater photo back to life.
Best App For Editing Underwater Photos
I have tried a few different apps on my iPhone for editing underwater photos, and so far Lightroom Mobile is still the best one for me. I also use CapCut and Edits for making short-form videos, but when it comes to color grading underwater photos, Lightroom gives me much better control, especially with tools like Color Mix / HSL, Masking, Light, Color, and Detail.
For this tutorial, I am using Lightroom Mobile Pro on my iPhone, but it also works on iPad and Android phones.
My Underwater Photo Editing Workflow in Lightroom Mobile
Before we start, please keep in mind that these exact numbers are based on this one photo only. Underwater photos can look very different depending on depth, visibility, sunlight, water color, and how far you are from the subject, so use my settings as a starting point, not as magic numbers that work for every photo.
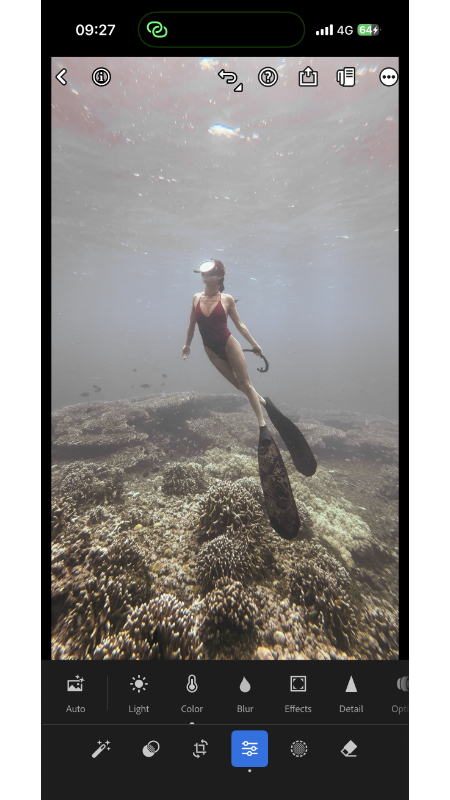
Step 1: Import Your Photo into Lightroom Mobile

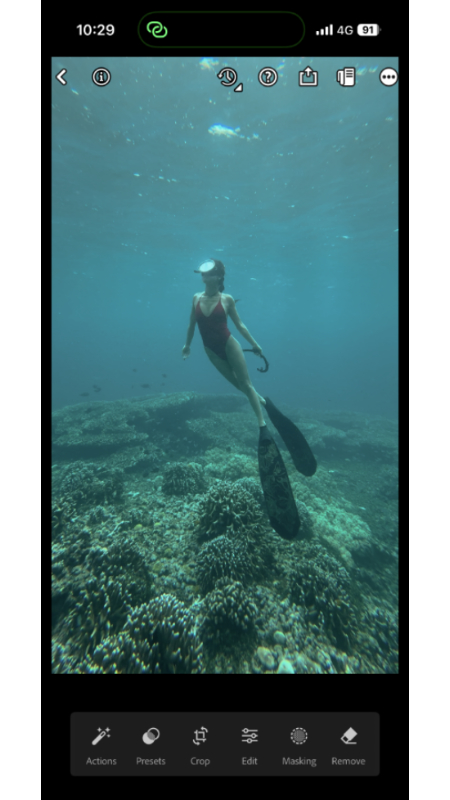
Open Lightroom Mobile on your iPhone and import the underwater photo you want to edit. For this tutorial, I am using a screenshot from one of my underwater videos, but you can also use a normal iPhone photo.
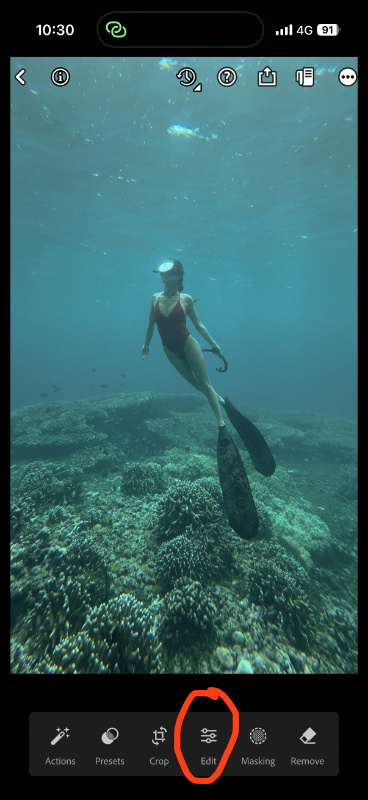
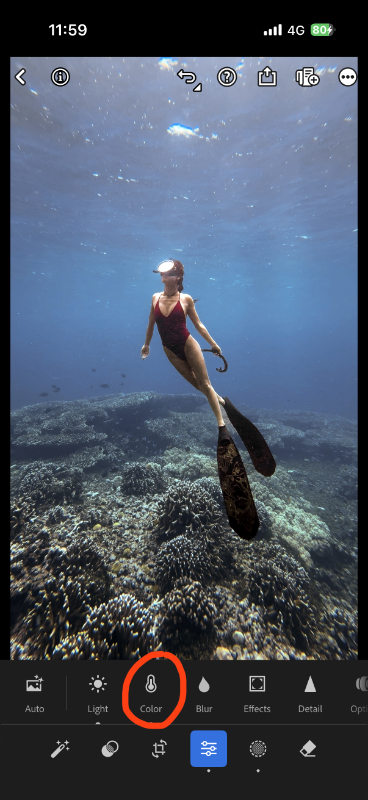
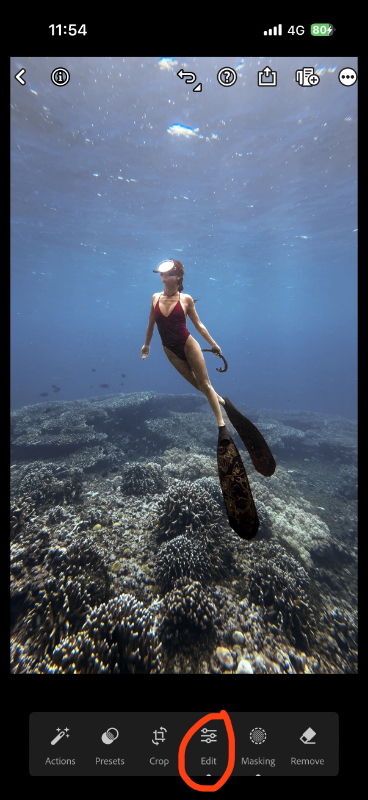
Once the photo is imported, tap Edit. I like to start with the basic color correction first, because underwater photos usually need a better color base before I work on contrast, masks, or details.
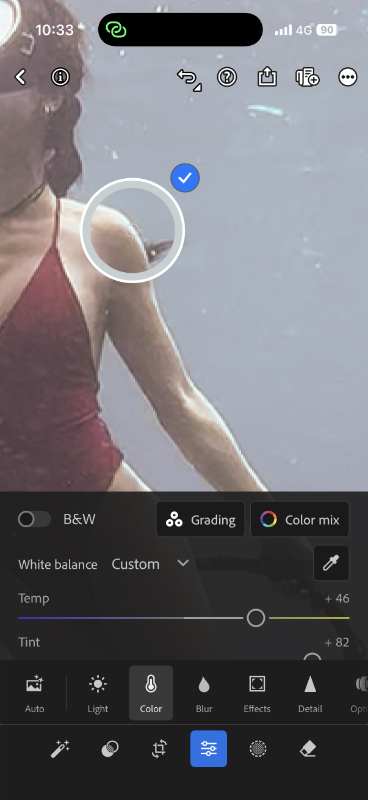
Step 2: Fix the White Balance

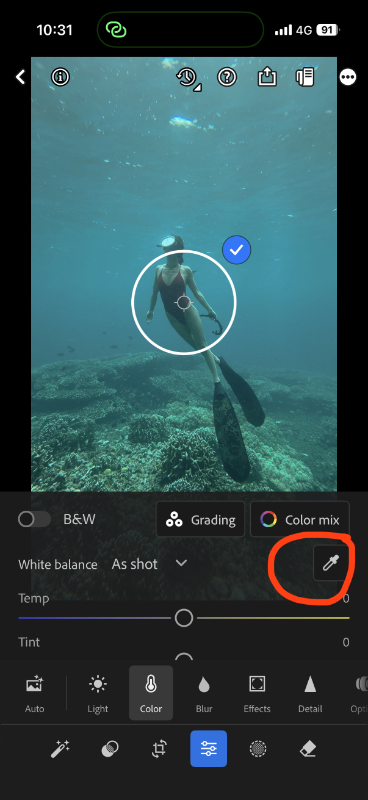
Go to Edit → Color → White Balance Tool, then zoom into the photo and tap on a part of the image that should be close to white or neutral.
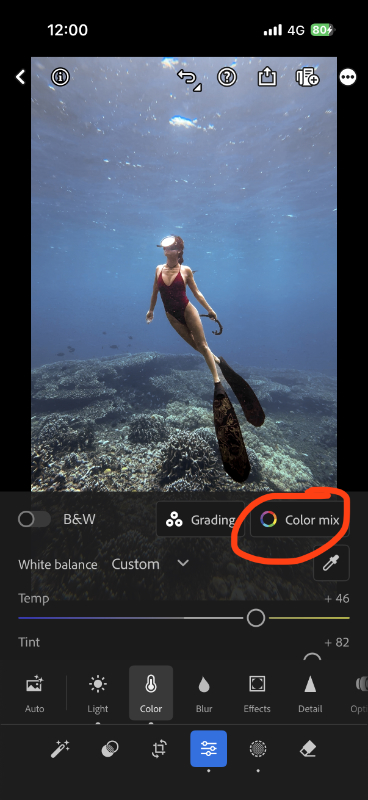
This step is important because white balance gives the whole photo a better starting point. Underwater photos often look too green or too blue, and if you start editing on top of a wrong color base, everything after that becomes harder to fix. After you apply the white balance tool, Lightroom will automatically adjust the temperature and tint, and you can also see the color values change.
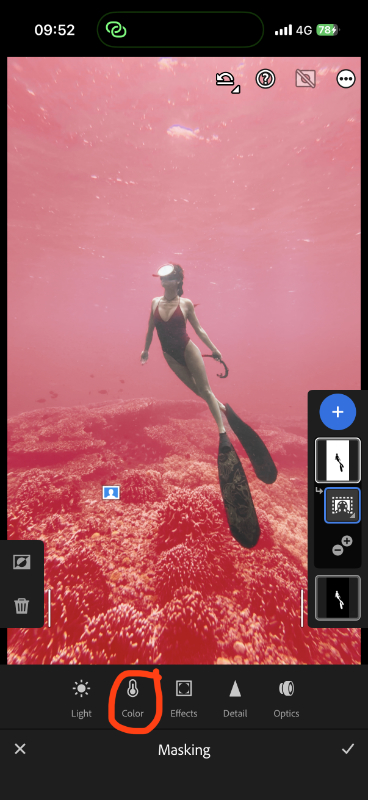
Step 3: Use Color Mix and light to fix the main colors
Next, go to Edit → Color → Color Mix. For this photo, I adjusted the purple and magenta/pink tones.
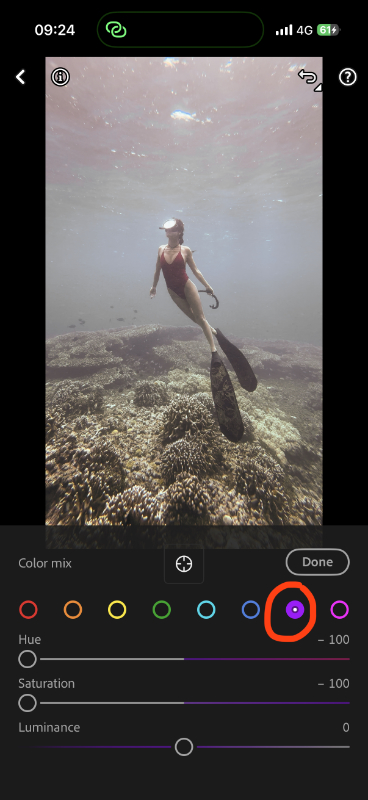
My settings for this photo:
Purple:
Hue: -100
Saturation: -100
Magenta / Pink:
Hue: -100
Saturation: -100
Then tap Done.
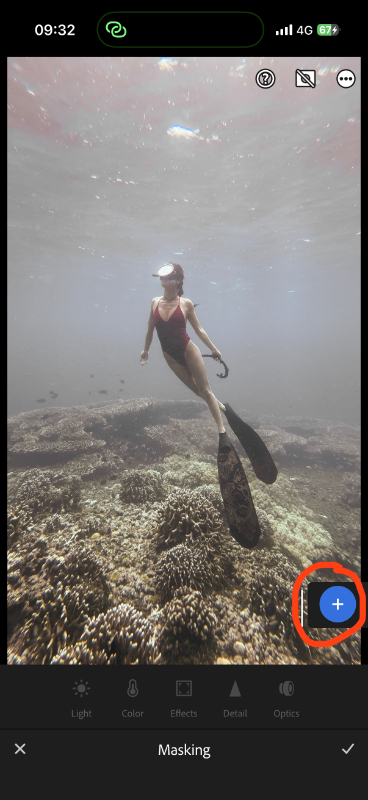
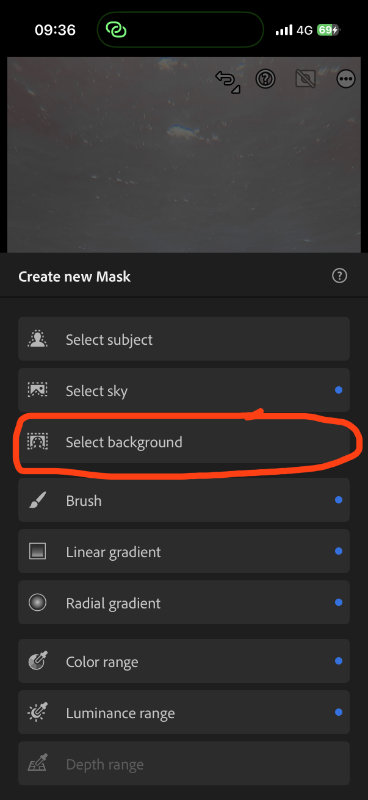
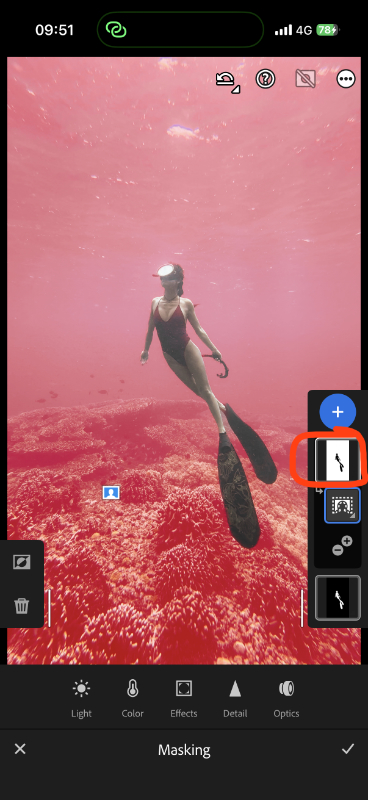
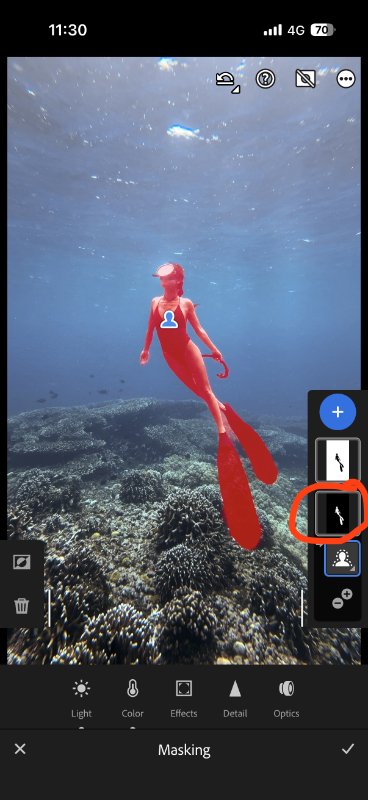
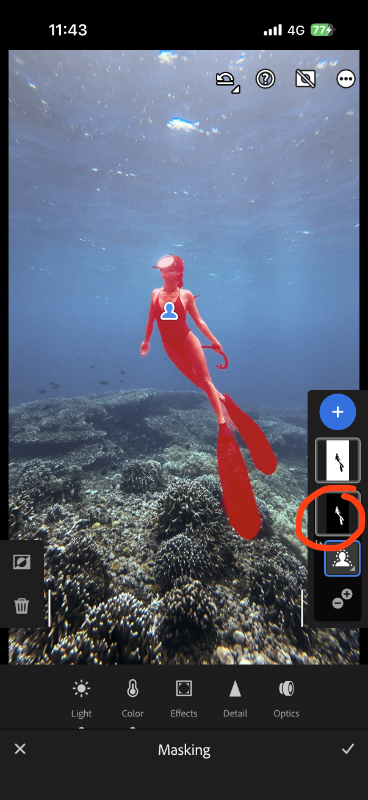
Step 4: Use Masking to Separate the Subject from the Background
Now go to Masking, tap +, then choose Select Subject. Lightroom will automatically detect the person in the photo, and you can tap the check mark to create the subject mask.
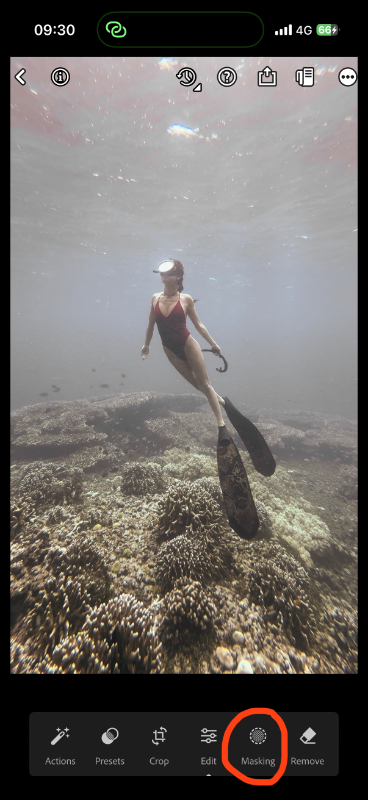
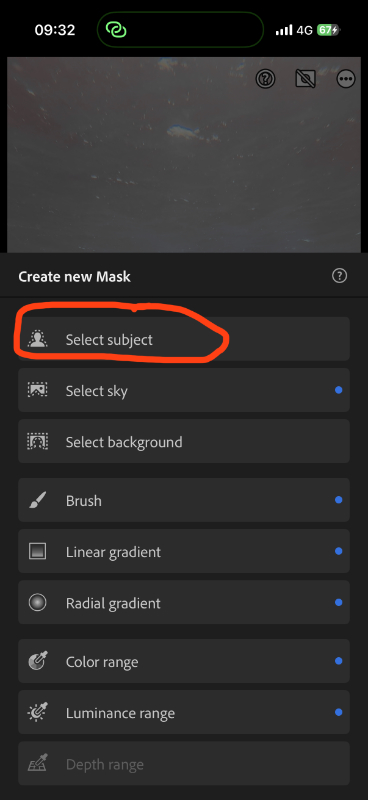
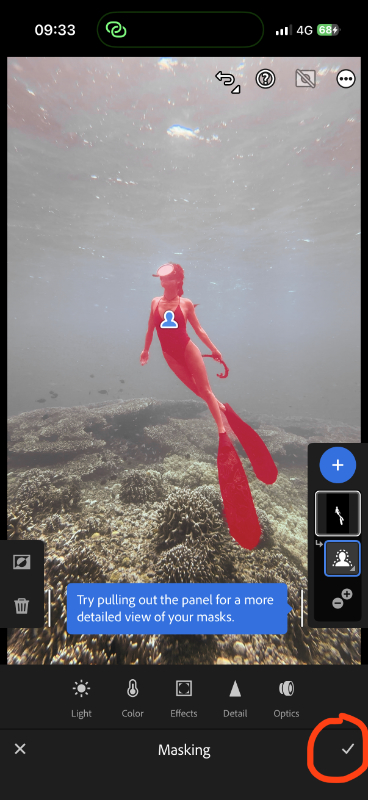
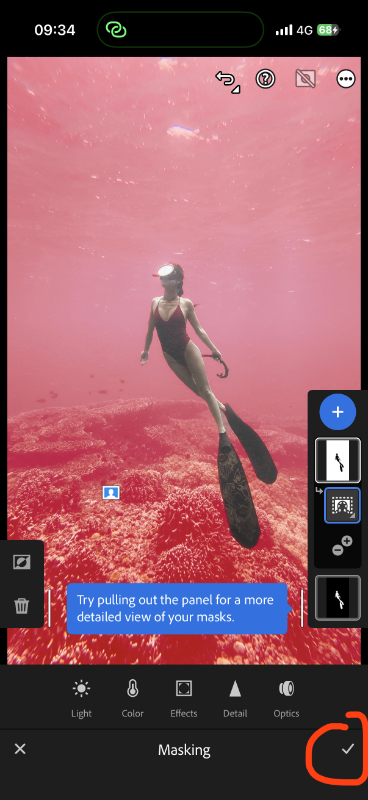
Then tap + again and choose Select Background, so you also have a separate mask for the ocean and reef behind the subject.
This is one of the most important steps in my underwater editing workflow, because the subject and the water usually need different edits. If I warm up the whole image, the skin may look better, but the ocean can become too warm or strange. By using separate masks, you can adjust the subject and the background separately.
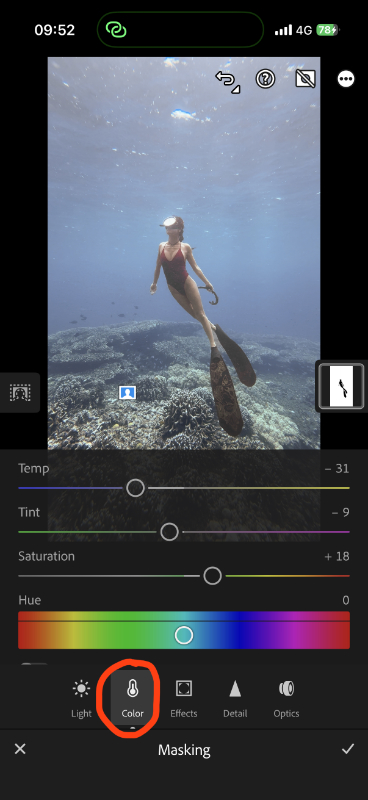
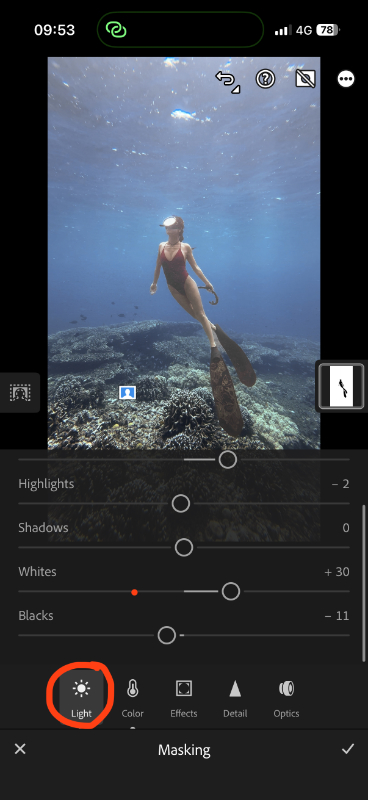
Step 5: Edit the Background and Subject Separately
Now let’s start working on the masks separately. For the background mask, I adjusted the color first:
Temp: -31
Tint: -9
Saturation: +18
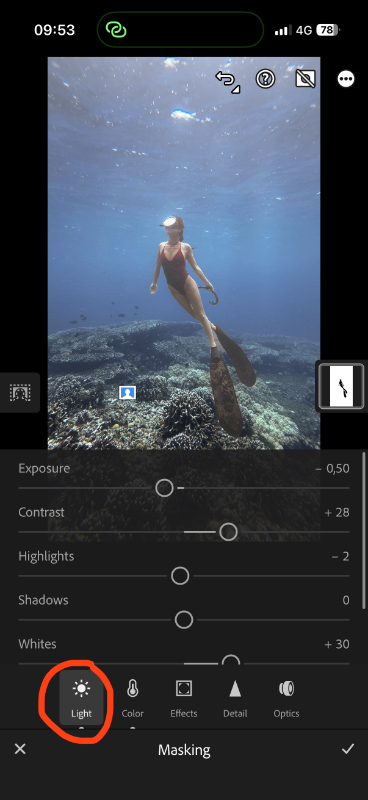
Then I adjusted the light:
Exposure: -0.5
Contrast: +28
Highlights: -2
Whites: +30
Blacks: -11
For the subject mask, I adjusted the color:
Saturation: +16
Then I adjusted the light:
Contrast: +25
Highlights: +33
Shadows: -8
Whites: +44
Blacks: -46
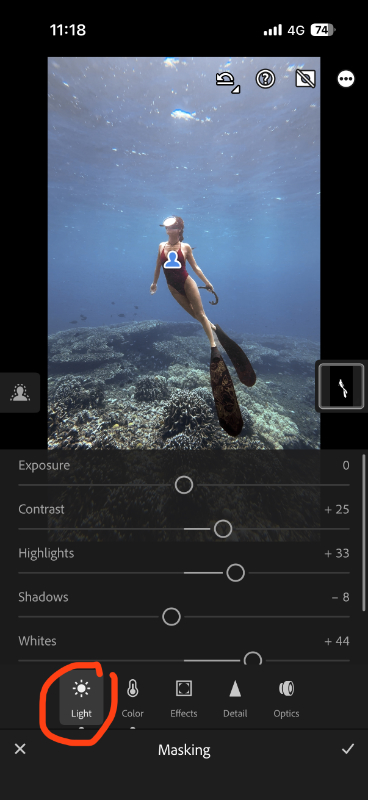
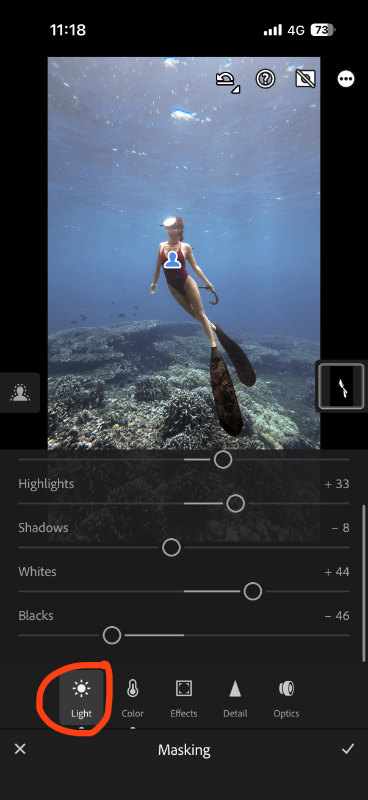
For the background, I wanted the water to look more blue, but still not too fake. For the subject, I wanted the body and swimsuit to stand out more, because in the original photo, the subject looked a bit dark and blended into the water. By making the subject a little warmer, it naturally pops out more from the blue background.
Step 6: Add Texture, Clarity, and Dehaze
After the main color and light adjustments, I go back to the subject mask and open Effects. For this photo, I used:
Texture: +15
Clarity: +15
Dehaze: +7
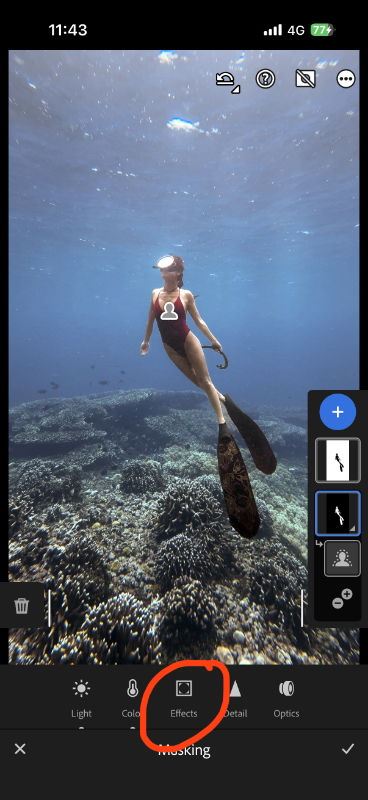

This helps the subject look a little more clear and defined. But be careful here, because too much Texture, Clarity, or Dehaze can make underwater photos look harsh, crunchy, or unnatural very quickly.
At this point, the photo is already about 90% done.
Step 7: Adjust the Whole Image Again
After editing the masks, I usually go back and adjust the whole image one more time. This is optional, but it helps to bring everything together.
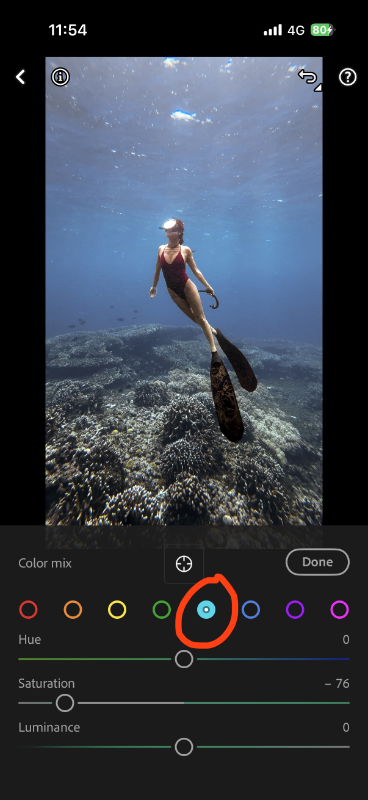
For this photo, I went to Edit → Color → Color Mix and adjusted the aqua / light blue tone:
Aqua / Light Blue Saturation: -76
Then I went to Edit → Light and made a few small final adjustments:
Exposure: -0.1
Contrast: +7
Blacks: -6
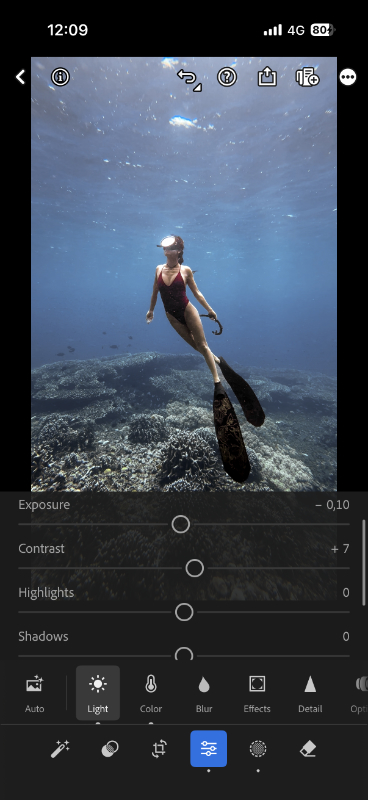
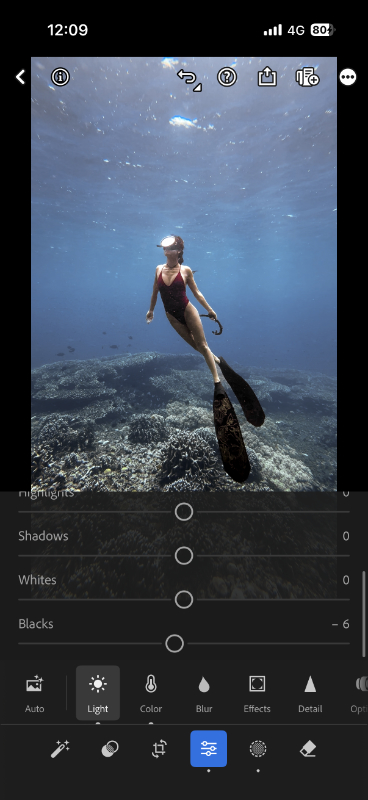
This final step is more about fine-tuning. After working on the subject and background separately, I like to look at the whole photo again and see if the colors still feel balanced.
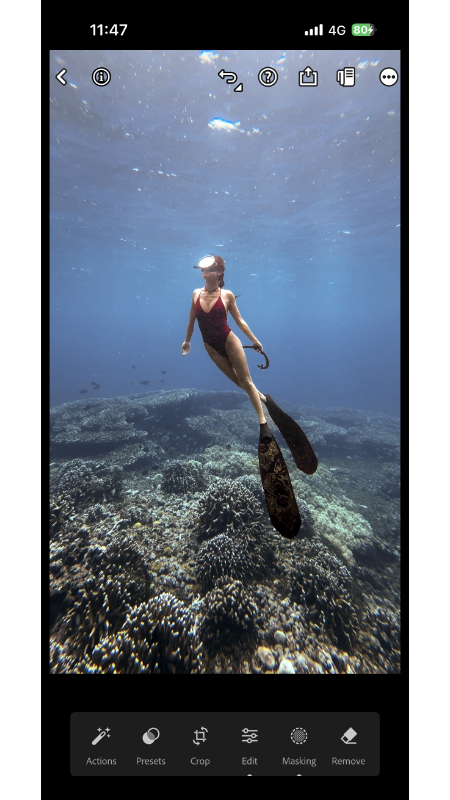
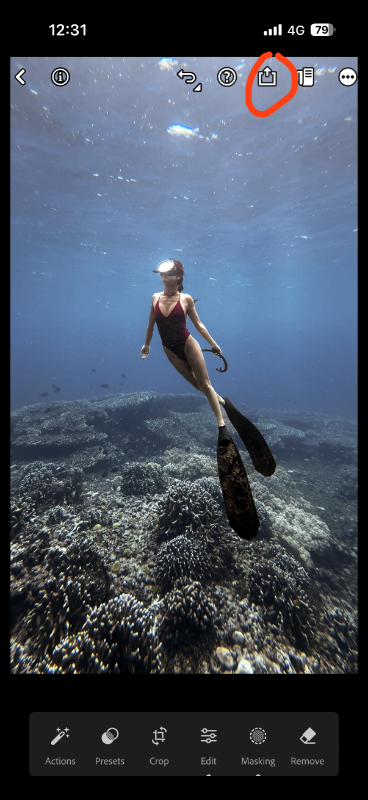
Step 8: Export the Final Photo for Social Media
Once you are happy with the edit, tap the export button and choose Save Copy to Device. I usually use the final photo for Instagram posts, TikTok covers, Reel covers, blog images, carousel posts, or just keep it on my phone for later.
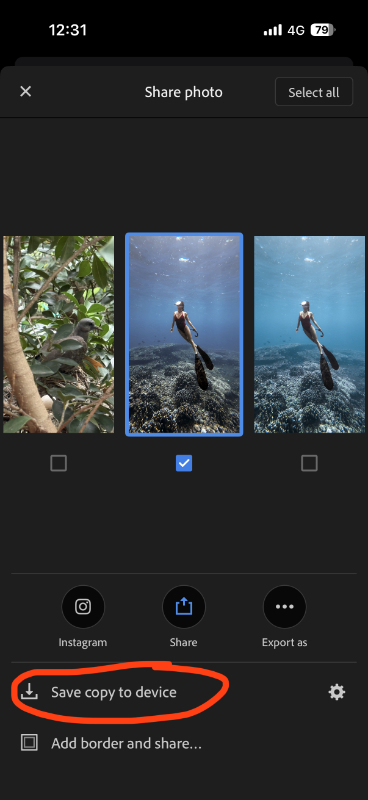
Keep a copy of the original photo, in case you want to re-edit it later. Also, don’t expect the exact same settings to work on every underwater photo, because depth, water color, visibility, sunlight, and distance can change the edit completely.
So play around with it, try different versions, compare them, and slowly you will understand what each tool does and what kind of underwater editing style you personally like. Editing underwater photos is a little bit like cooking for me, you follow a basic process first, but after that, you can experiment and adjust it until it feels right.
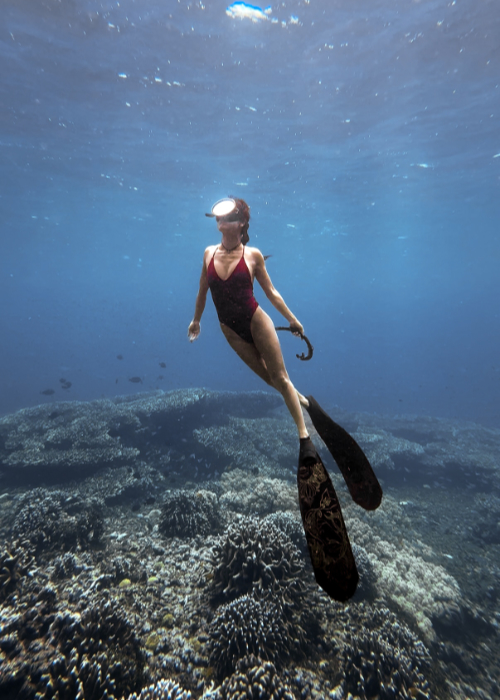
Before and After: How to edit underwater photos on iPhone

Here is the before and after of the photo I edited in this tutorial. The original image looked quite green and flat, which is very common for underwater iPhone photos, especially when there is no red filter, no extra light, and the visibility is not perfect.
The biggest change I made was bringing back a cleaner blue tone in the water and making the skin look more natural again. The white balance adjustment in the beginning was really important here, because it gave the photo a better base before I started changing the other colors. After that, masking helped a lot because I could warm up the subject and make the skin look better, without making the whole ocean turn too warm or unnatural.
Also keep in mind that this photo is actually a screenshot from one of my underwater videos, not a photo taken directly in photo mode. If you edit an actual photo file, especially one with more image information, you may be able to get an even better result. But for a quick iPhone workflow, this already shows how much you can improve an underwater image with just a few Lightroom Mobile adjustments.
Best Underwater Phone Case for iPhone & Android
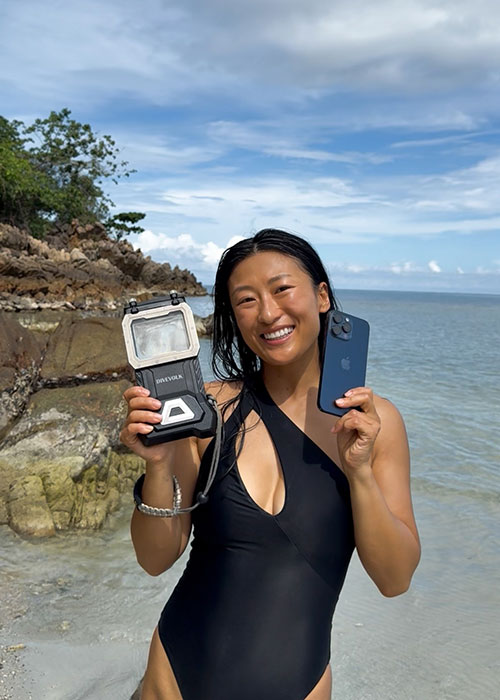
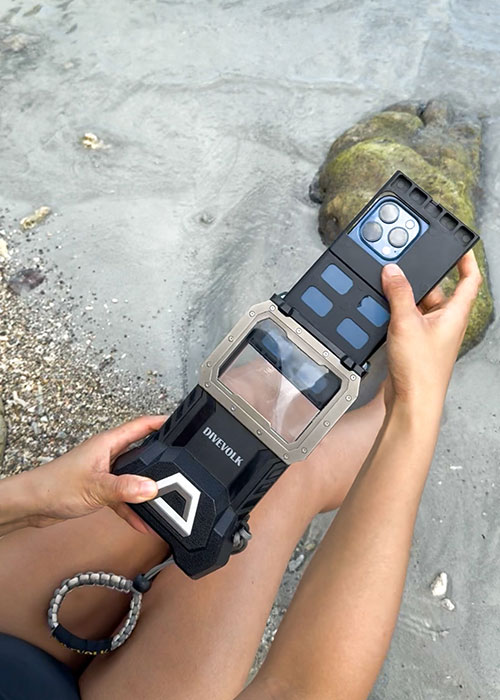
I currently use an iPhone 16 Pro inside a DIVEVOLK SeaTouch 4 Max Plus case. Around 80% of the time, I also use a wide-angle lens because I simply like how it makes my underwater videos and photos look. It gives me a wider view without making the image look too distorted, and for my taste, the water also looks cleaner and the whole scene feels more dramatic and cinematic.
If you want to know more about the underwater phone case I use, I also have a full DIVEVOLK SeaTouch 4 Max Plus review here:
👉 Divevolk SeaTouch 4 Max Plus Review
Related guides from my underwater iPhone setup:
👉 Best IPhone Settings For Underwater Photos & Videos (Instagram & TikTok Guide)
👉 How To Take Underwater Photos With iPhone
👉 How To Edit Underwater Videos On IPhone: Color Grading In 5 Mins
👉 How I Create Underwater Instagram Reels
My DIVEVOLK Discount Code
You can use my DIVEVOLK discount code DIVETIAN6 at checkout to get:
- 6% off your entire order
- a free Protective Cover
- extra gifts for orders over $500, including a Travel Case and L-shaped handle bracket
👉 Use code: DIVETIAN6
👉 Order through my DIVEVOLK discount link
The extra freebies usually won’t show on the checkout page, but they will be automatically added to your order by DIVEVOLK.
Just a quick note: I may earn a commission if you order through my link, but this is the exact underwater phone case setup I use myself.
Common Mistakes When Editing Underwater Photos on iPhone
Making the Water Too Blue or too purple
This is probably one of the most common mistakes when editing underwater photos, especially in the beginning. Because we are trying to remove the green tone or bring back the blue water, it is very easy to push the color too far and make the whole photo look too blue, too purple, or a little bit unnatural.
There is no perfect answer for how underwater colors “should” look, because everyone has a different editing style and personal taste. But if you are not sure, save your edit and come back to it a few hours later, or even the next day. Sometimes when you look at the same photo with fresh eyes, you can immediately see if the water color feels too much. You can also make two or three versions of the same photo and compare them side by side, which is honestly one of the best ways to train your eyes.
Using Too Much Dehaze or Clarity
Dehaze and Clarity can make an underwater photo look sharper and more dramatic, but they can also make the image look harsh very quickly. If you push them too much, the water can start to look dirty, the light can look unnatural, and the whole photo can lose that soft underwater feeling.
I usually like adding a little bit of contrast and pop, but I still want the photo to feel natural. So instead of pushing Dehaze or Clarity too high, try making a softer version and a stronger version, then compare them. Most of the time, the better edit is somewhere in the middle.
Adding Too Much Saturation
It is also very easy to add too much saturation because underwater photos often look flat before editing. But if you push saturation too far, the water can become too neon, the skin can look strange, and the photo starts to feel fake.
For underwater photos, I usually prefer working more carefully with Color Mix / HSL instead of only increasing the overall saturation. This way, you can adjust the blue, aqua, green, orange, or red tones separately, instead of making every color stronger at the same time. It gives you much better control and the result usually looks more natural.
Trying to Save a Photo That Was Too Dark or Blurry
Editing can do a lot, but it cannot fix everything. If a photo is extremely blurry, too dark, or the subject is too far away, there may not be enough information in the image to bring it back properly. You can brighten it, sharpen it, or reduce noise a little bit, but it will never look as clean as a photo that was already shot in good light and clear water.
That is why you should try to take the photo as good as you can underwater Try to shoot when the water is clear, stay close to your subject, and use good natural light whenever you can. The better the original photo or video frame is, the easier it will be to edit later, and the final result will look much cleaner.
FAQ: How To Edit Underwater Photos on iPhone
Can I edit underwater photos without Lightroom Mobile?
Yes, you can. You can use the iPhone Photos app, CapCut, or any other editing app you like for basic edits, especially if you only want to adjust brightness, warmth, tint, or contrast. But from all the apps I have tried so far, Lightroom Mobile gives me the most control over white balance, Color Mix / HSL, masking, and details, which are very useful for underwater photos.
Do I need Lightroom Mobile Pro?
You do not need it for very basic edits, but for this workflow, I personally use the pro version because I use almost every functions on this app to edit my underwater photos and videos. If you want more control over colors, masks, and selective adjustments, Lightroom Mobile Pro is much better than the free version.
Can I use this workflow for Android underwater photos?
Yes. Lightroom Mobile also works on Android phones, so you can use the same basic editing workflow even if your underwater photos were not shot on an iPhone. The exact settings may need to change depending on your phone, water color, depth, and lighting, but the process is still the same.
Can I edit screenshots from underwater videos?
Yes, and this is actually what I am doing in this tutorial. The example image here is a screenshot from one of my underwater iPhone videos. If you edit a real photo file, you may have more image information and get an even better result, but screenshots from good-quality videos can still work very well for social media, blog images, or carousel posts.
Why do my underwater photos look blue or green?
Underwater photos often look blue or green because water absorbs warm colors first, especially red and orange tones. The deeper you go, the more color and light you lose, so white balance and color correction become very important when editing underwater photos on iPhone.
What is the best app for editing underwater photos on iPhone?
For my workflow, Lightroom Mobile works the best so far, especially for color correction and masking. But if you only want a simple edit, the iPhone Photos app or CapCut can also work, especially when the original photo already looks quite good and does not need heavy color fixing.
Watch the Full Underwater iPhone Photo Editing Tutorial
If you prefer to see the whole process on screen, I also made a full YouTube tutorial where I edit this underwater iPhone photo step by step in Lightroom Mobile. You can watch the video below and follow along with the same workflow on your own photo.