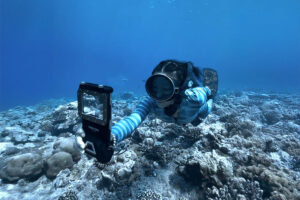
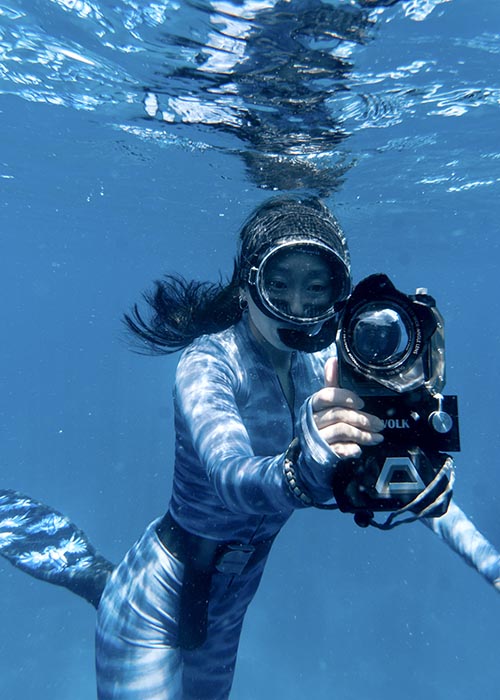
If you want to create beautiful underwater photos and videos with your iPhone, you really don’t need a $5,000 camera rig or a huge professional housing. The truth is, some of my most viral reels on Instagram — the ones with millions of views — were all filmed underwater with nothing more than my iPhone inside a DIVEVOLK SeaTouch 4 Max Plus housing.
Because of that, I get asked all the time what camera settings I use for my underwater photos and videos.
So in this guide, I’m going to show you the exact iPhone settings and simple shooting setup I use. This is the same workflow I’ve refined over more than three years of filming underwater all over the world — and it’s what allows me to get clean, colorful, natural-looking footage straight out of my phone.
Best Underwater iPhone Camera Setup
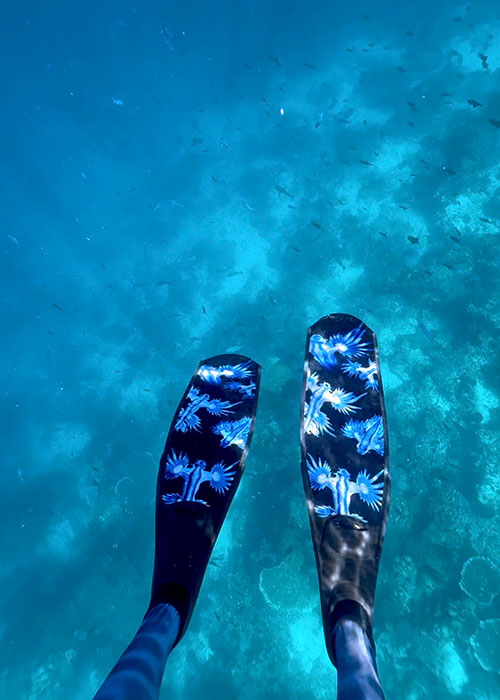
If you’re mostly freediving or snorkeling, your setup can actually be very simple.
- Your iphone or Android smartphone
- DIVEVOLK SeaTouch 4 Max Plus case
- Red filter
- Wide angle lens
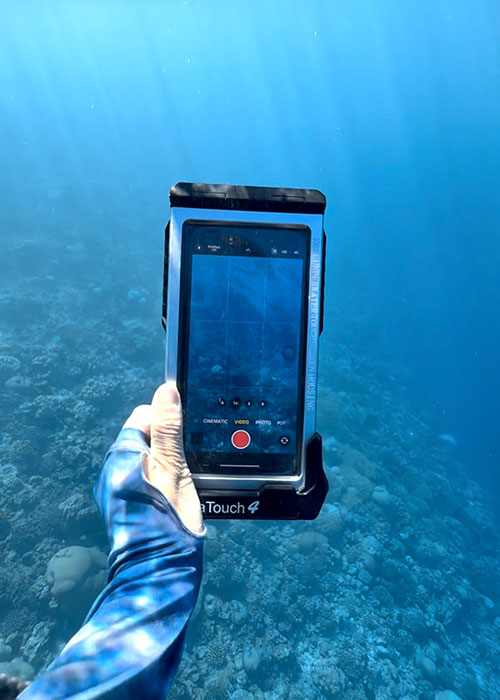
After trying a lot of different things over the years, I ended up always coming back to the same one piece of gear: the DIVEVOLK SeaTouch 4 Max Plus. It’s the only phone housing I really trust when I’m filming underwater, because it lets me use my iPhone the same way I do on land with full touchscreen access. If you want to read all the details, I wrote a full review here:
👉 Divevolk SeaTouch 4 Max Plus Review
The DIVEVOLK ocean kit include also Red filter and Wide angle lens in this combo, which is pretty much everything I use during freediving.
Best iPhone underwater camera settings
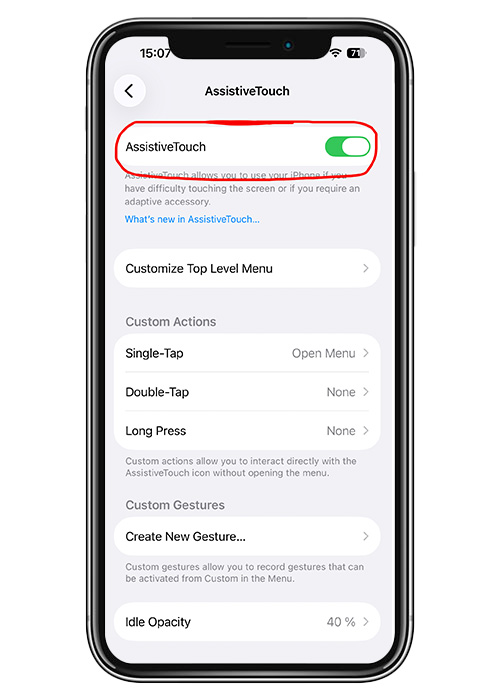
1. Turn on AssistiveTouch
Before every dive, there’s one small thing I always turn on, and it makes a much bigger difference than most people realize. It’s called AssistiveTouch.
On your iPhone go to:
Settings → Accessibility → Touch → AssistiveTouch → ON
Then add it to your Control Center:
Settings → Control Center → Add AssistiveTouch
This way you can quickly turn it on or off right before you jump into the water.
Here’s why this matters: when your iPhone is inside the DIVEVOLK housing, you’re no longer touching the glass directly — you’re pressing on a membrane. Swiping like you normally would on land can sometimes feel a bit slow or imprecise.
AssistiveTouch gives you a small floating button on the screen that you can tap instead. It makes controlling the camera much smoother and more reliable underwater, especially when you’re trying to quit the camera app and go back to your home page on your phone.
The touchscreen of the DIVEVOLK case still works without it, but with AssistiveTouch turned on it’s much easier to control your phone underwater — and it saves you time.
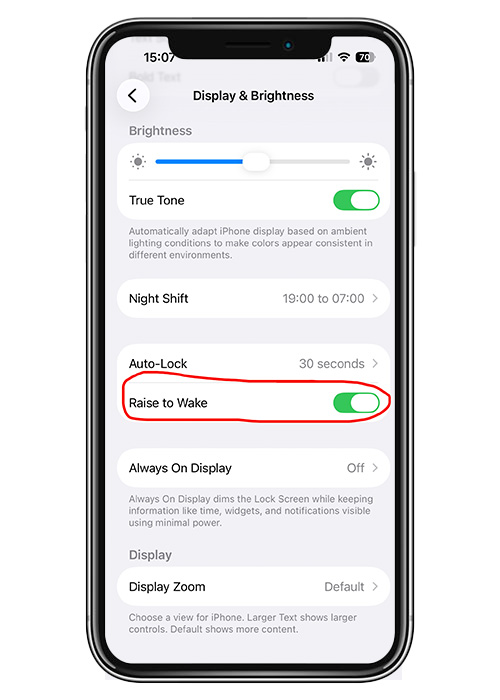
2. Turn on Raise to Wake
Go to:
Settings → Display & Brightness → Raise to Wake → ON
Once this is on, your screen will light up automatically when you lift or move your phone — which is super useful inside the DIVEVOLK housing, because you don’t have to press any buttons to wake the screen underwater.
How to Avoid Foggy Lenses When Filming Underwater
These 2 small steps save most people from completely ruining their footage — and I’m not exaggerating.
1. Clean your lenses.
Before you put your phone into the housing, quickly wipe all the camera lenses, front and back. A tiny fingerprint or salt spray is enough to make everything look soft and blurry underwater.
2. Make sure to insert your phone into the case and close it properly before you go on the boat.
Doing it on land helps keep moisture and humid air out of the case. This one simple habit alone prevents most foggy-lens problems people have. Since I started doing this, I’ve never had a foggy lens during my dives.
If you don’t have a DIVEVOLK housing yet and want to see how to properly set it up with your phone, it’s really simple. It takes about 10 seconds and then you’re ready to go. You can click here to watch how to do it.
Best iPhone Camera Lens for Underwater Filming (0.5× Wide)
When I’m underwater, I’m filming most of my videos with 0.5× zoom.
This setting gives you a much wider view and makes the footage feel more open and immersive instead of tight and flat. Especially when you’re filming another person, 0.5× helps a lot — it gives you a nicer frame and makes the body proportions look more natural and flattering. That’s exactly the kind of look people on Instagram and TikTok like to watch.
If you want to push this even further, you can add a wide-angle lens on top of the 0.5× setting. This makes the image feel even more spacious and three-dimensional, instead of looking like typical phone footage. I’ve noticed that wide-angle lenses work especially well with iPhones underwater — everything just feels more alive and less flat.
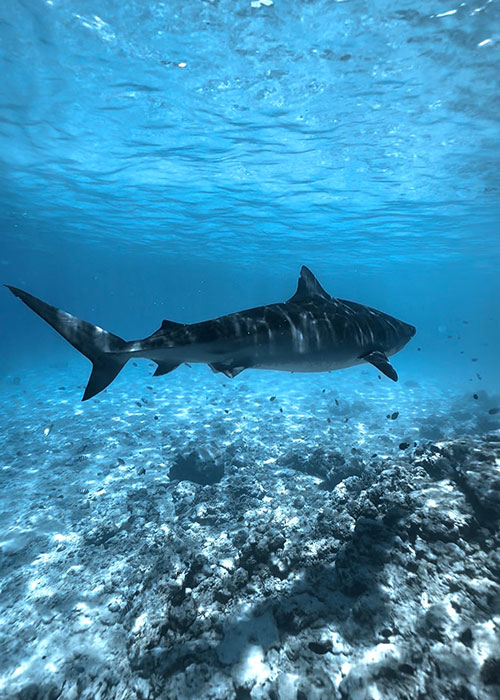
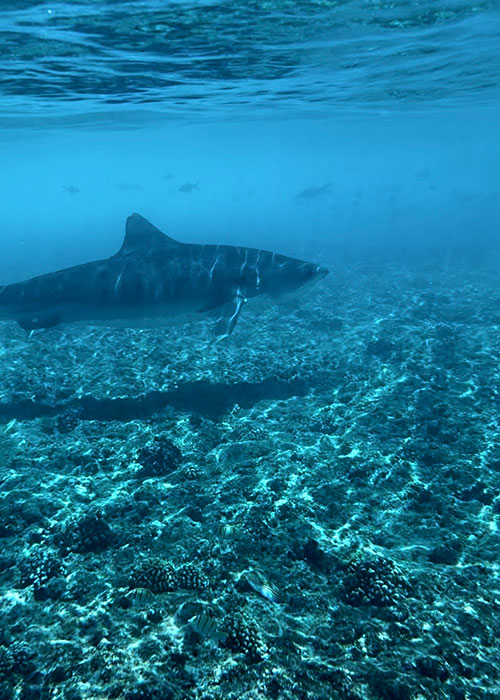
I also use 0.5× when I’m out in the ocean with whales or sharks. Underwater your view is already limited by your mask, and the camera sees even less than your eyes. Using 0.5× opens the view a little bit so you can catch more of what’s happening around you — sometimes even moments you didn’t notice in real life. And when an animal is very big, like a whale, 0.5× helps you fit more of it into the frame instead of cutting it off. Honestly, it just looks better most of the time.
This is also why most of my Instagram and TikTok shots are filmed this way — I explain the full shooting style in this article: 👉 How To Create Underwater Photos & Videos For Instagram & TikTok
When to Use 1×, 2× or 5× Zoom Underwater
When you want to film close-ups — like fish, corals, or details on the reef — you have two options. You can stay on 1× and swim closer, or you can try 2× or 5× zoom.
I personally recommend going closer whenever you can. The reason is simple: you get more natural colors in your footage, which makes editing and color grading much easier later. If you’re curious about how I color grade those clips, I’ve written a guide on 👉 how to edit and color grade underwater videos on iPhone in 5 mins
Using 5× zoom while freediving is tricky because every little movement gets amplified, so the footage can shake a lot. If you really want to use it, dive down first and hold onto a rock or something solid to stabilize yourself.
Best Lighting for Underwater iPhone Videos
Lighting is everything underwater. It matters way more than most people think.
A lot of people believe that a bright, sunny day around noon must be the best time to shoot underwater. It sounds logical — more sun, more light, better footage. But underwater it usually works the other way around.
When the sun is very strong and directly overhead, your videos get over-exposed and over-contrasted. The bright parts become too bright, and anything in the shade turns very dark and almost black. The image starts to look harsh and hard, and later when you try to edit it, there is not much you can do to fix it.
That’s why I almost always try to film before 11am or after 3pm. At those times the light is softer, the contrast is gentler, and the colors look much more natural. It also makes editing on your phone much easier afterwards. If you can, a slightly cloudy day works great too — the light becomes even more even and forgiving underwater.
One of the things I love about the DIVEVOLK housing is that you can use your iPhone underwater just like you would on land. So if the light is still too strong — especially when you are filming close to the surface, where the light is the brightest — you can simply lower the exposure.
Here’s how I do it:
Open the camera, switch to video, and before you start recording, tap on the screen. You’ll see a yellow square with a little sun icon next to it. Drag the sun down a bit, and you’ll see the image become less bright and more balanced.
That small adjustment can make a huge difference in how your underwater footage looks.
Remember to Check Your Clips Between Dives
After each freedive, I always take a moment to check my camera roll and watch what I just filmed. If I got the shot I wanted, great. If not, I’ll just go again. This way I make sure all the footage I film is usable and I can turn it into a nice reel later.
And with the DIVEVOLK housing, you can easily check your recorded footage while you are still underwater — pretty cool right?
For Scuba Divers
If you’re a scuba diver, everything changes, because you have much more bottom time and you’re usually diving deeper. And that’s exactly where phone cameras start to struggle.
Once you go deeper than about 10 meters, colors disappear very quickly — especially red. That’s why, for scuba diving, I really recommend using the Creator Kit, which includes a dive light, a wide-angle lens, a red filter, and a Bluetooth shutter.
The dive light is what brings the colors back into your footage. Without it, everything looks blue and dull, no matter how good your phone is. The red filter helps restore the warm tones that water removes, so skin tones, coral and fish look much more natural instead of cold and washed out. When you use both together, your videos suddenly look much closer to what you actually see underwater.
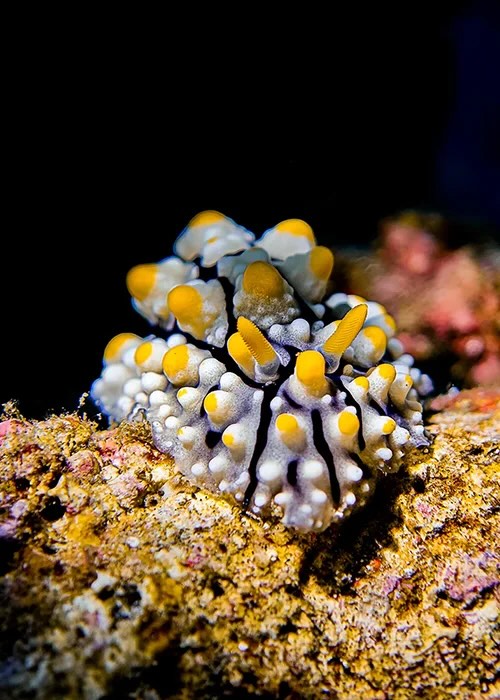
If you love filming small creatures and details, there’s another setup I really like: the Divevolk Advanced Macro Kit. It comes with a +18 macro lens and an SL20 dive light, which lets you get extremely close to tiny subjects like shrimp, nudibranchs or coral polyps.
What’s special about this combo is that it creates those beautiful dark backgrounds and strong contrast, so your subject really pops. And the crazy part is that you can do all of this with just your phone.

Exclusive DIVEVOLK Discount Code & Freebies On Freedive The World Readers
I’ve been using the DIVEVOLK SeaTouch 4 Max Plus for over 3 years across freediving, snorkeling, and underwater filming all over the world. Because of this long-term partnership, DIVEVOLK gave me a private discount code that isn’t publicly available.
I have created a dedicated page with all the details on how to claim your gifts: 👉DIVEVOLK Discount Code (2026) – Get 6% OFF + Free Gifts
However, if you are ready to order now through my personal DIVEVOLK link and use the code DIVETIAN6, you’ll get:
- 6% off your entire order
- A free Protective Cover (perfect for flights and dive trips)
And if your order is over $500, you’ll also receive:
These are the same accessories I use on my own rig, and they’re extremely useful for travel and stability underwater.
👉 Use code: DIVETIAN6 at checkout
👉 Order directly from DIVEVOLK here
The extra freebies won’t show on the checkout page, but they will be automatically added to your order by DIVEVOLK.